
Compare the best theory test apps for UK learners, see how official DVSA questions and four in one practice fit together, and follow Mudassar’s study plan...
Pass Your UK Driving Test: Nail Pull Up on the Right in 90 Seconds
Pulling up on the right means stopping on the opposite side of the road, reversing back roughly two car lengths, then rejoining traffic when it’s safe. Examiners aren’t grading a perfect parking spot here. They want to see controlled, slow reversing and thorough observation, especially a right shoulder check for cyclists before you move off again.
TL;DR:
- The pull up on the right maneuver is designed to mimic real-life driving situations, such as deliveries or parking on the right side of the road.
- Full observation, including a shoulder check for cyclists, is crucial to avoid common faults like missed checks or mounting the kerb during reversal.
- Practicing slow, controlled reversing with consistent reference points and clear signals helps build muscle memory and control for test success.
- Examiners prioritize observation and control over precision, and failures often stem from rushing or neglecting safety checks rather than steering accuracy.
- Repetition in a quiet environment, focusing on the full sequence, is the most effective way for learners to pass this maneuver confidently.
Table of Contents
- Why the pull up on the right manoeuvre exists and when it comes up
- What the examiner is actually watching for
- How do you actually perform the manoeuvre step by step?
- Getting the reverse straight: reference points and steering control
- The mistakes that fail this manoeuvre, and how to drill them out
- Is it safe to pull over on the right in everyday driving?
- An instructor’s checklist: what actually separates a pass from a fail
- Book focused manoeuvre practice before your test
- Sources
Why the pull up on the right manoeuvre exists and when it comes up
This isn’t an old-fashioned test quirk. The exercise was added to the practical driving test in December 2017, alongside a wider shake-up designed to make the test reflect real driving rather than test-centre routine. DVSA wanted a manoeuvre that mimicked something drivers actually do: pulling in on the wrong side of the road for a delivery, a drop-off, or because that’s simply where the space was.
The examiner will ask you to do three things in sequence, and they’ll usually give the instruction on a fairly ordinary residential road:
- Pull up on the right-hand side of the road, safely and under control.
- Reverse back for a short distance roughly equivalent to a couple of car lengths, keeping close and parallel to the kerb.
- Rejoin the traffic flow only when it’s genuinely clear to do so.
According to GOV.UK’s official breakdown of the test, this sits alongside forward bay parking and parallel parking as one of the manoeuvres examiners can select on the day. You won’t get advance warning of which one you’ll be asked to perform.
Timing wise, the whole thing is quick. Most candidates complete the pull up, reverse, and rejoin inside about 90 seconds, according to the same DVSA guidance on the 2017 test changes. That’s not much time to recover from a bad start, which is exactly why the routine needs to become automatic before test day.
What the examiner is actually watching for
Observation comes first, control comes second, and pinpoint accuracy trails a distant third. That ordering matters because a lot of learners over-focus on stopping exactly parallel to the kerb and under-focus on the checks either side of it.
Before you even signal, the examiner wants to see the standard mirror-signal-manoeuvre sequence: interior mirror, right door mirror, a proper look over your right shoulder, then the signal. That shoulder check isn’t decorative. Cyclists filtering past on the offside are the specific hazard this manoeuvre is built to test for, and DVSA guidance flags a missed shoulder check as one of the most common serious faults candidates rack up on this exercise.
Once you’re reversing, control means slow, straight, and minimal steering. Examiners are looking for:
- A smooth, walking-pace reverse with no sudden corrections.
- The car staying roughly parallel to the kerb throughout.
- Full 360 degree observation before and during the reverse, not just a glance in the mirror.
- A calm, unhurried rejoin once the road is genuinely clear.
Statistic to remember: aim to stop around 30cm from the kerb when you first pull up, according to instructor guidance from Passrates’ manoeuvre breakdown. Mount the kerb during the reverse and you’re looking at an instant serious fault, so a little extra distance from the kerb at the start buys you a safety margin later.
One thing worth knowing before you’re sat in the car: examiners won’t coach you through this. They’ll give the instruction once, clearly, and then it’s on you to demonstrate the decision making. Hesitating and waiting for a prompt is itself a sign to the examiner that the routine isn’t second nature yet.
How do you actually perform the manoeuvre step by step?
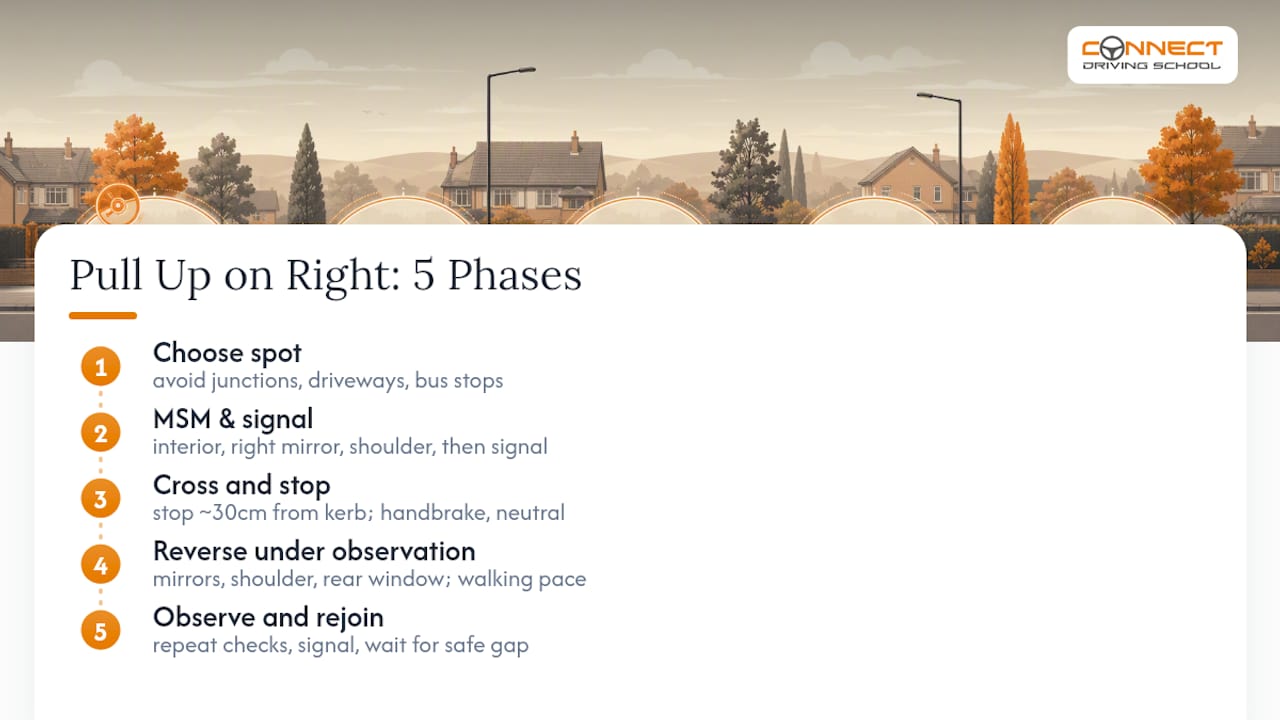
Break this into five phases and it stops feeling like one overwhelming task. Most learners who fail this exercise fail one specific phase, usually the observation before rejoining, not the whole thing.
1. Choose your spot before you signal.
As soon as the examiner gives the instruction, start scanning ahead for somewhere sensible to stop. Avoid junctions, driveways, bus stops, and anywhere with parked cars close together that would block your view or your reverse. You’ve got a few seconds of thinking time here, and using it well sets up everything that follows.
2. Run the full MSM sequence.
Check your interior mirror, then your right door mirror, then look properly over your right shoulder into your blind spot. Only then signal right. Hold the signal long enough that anyone behind or approaching from the front genuinely registers your intention, rather than cancelling it the instant you start turning the wheel.
3. Cross and stop.
Move across to the right-hand side only when there’s a safe, unhurried gap in oncoming traffic. Bring the car to a stop roughly parallel to the kerb, around 30cm away from it, using the technique outlined in DVSA-aligned instructor guides. Apply the handbrake and select neutral (or engage auto-hold if you’re driving an automatic), then cancel your signal.
4. Reverse under full observation.
This is where most marks are won or lost. Before you move at all, take in the whole picture: both door mirrors, over your right shoulder, and a check through the rear window. Then reverse at a genuine walking pace for about two car lengths, using a fixed point on the kerb as your reference. Keep the steering wheel still once you’re tracking parallel. Little corrective wiggles here read as a lack of control to the examiner, even if you never actually touch the kerb.
5. Prepare to rejoin and move off.
Secure the car again with the handbrake and neutral. Then repeat the full observation routine: mirrors, right shoulder, left shoulder if relevant, signal right, and wait for a gap that’s actually safe rather than merely convenient. Only pull away once you’re certain, not once you’re impatient.
Pro Tip: Practise saying the checks out loud during lessons, even after you’ve stopped needing to. “Mirror, mirror, shoulder, signal” spoken aloud forces the sequence into muscle memory faster than silent repetition ever does, and it’s much harder to skip a step you’re narrating.
Getting the reverse straight: reference points and steering control
Two car lengths sounds vague until you translate it into something you can actually judge from the driver’s seat. In real terms, that’s roughly 8 to 10 metres, depending on the vehicle, a figure backed by instructor guidance on the manoeuvre.
Rather than counting metres in your head while reversing, pick a fixed feature on the kerb before you start. A driveway entrance, a distinctive paving slab, or a lamppost all work. Glance at it in your left mirror as you begin reversing, and you’ll have a natural marker for when to stop, rather than guessing distance under pressure.
Steering technique matters just as much as distance. A handful of principles keep the reverse tidy:
- Once the car is tracking parallel to the kerb, leave the steering wheel alone.
- Small, frequent corrections look worse to an examiner than one confident, minimal turn at the start.
- Use the rear window as your primary view while reversing, glancing at the door mirrors only to check your distance from the kerb.
- Keep speed at a genuine walking pace throughout, not just at the start.
Worth remembering: guidance from driving instructors consistently points to walking pace and minimal steering as the two biggest factors separating a controlled reverse from one that drifts, according to Optimus School of Motoring’s manoeuvre guide. Speed is the easier of the two to fix. Slow the car down and most steering wobbles sort themselves out because you have more time to react to what you’re seeing.
The mistakes that fail this manoeuvre, and how to drill them out
Three mistakes account for most fails on this exercise, and none of them are about steering precision.
Common fail points:
- A missed or rushed right shoulder check, either before reversing or before rejoining. This is the single most cited immediate fail on this manoeuvre.
- Rushing the move-off, pulling away before genuinely checking the gap is safe rather than just plausible.
- Mounting the kerb during the reverse, usually because the initial stop was too close to it.
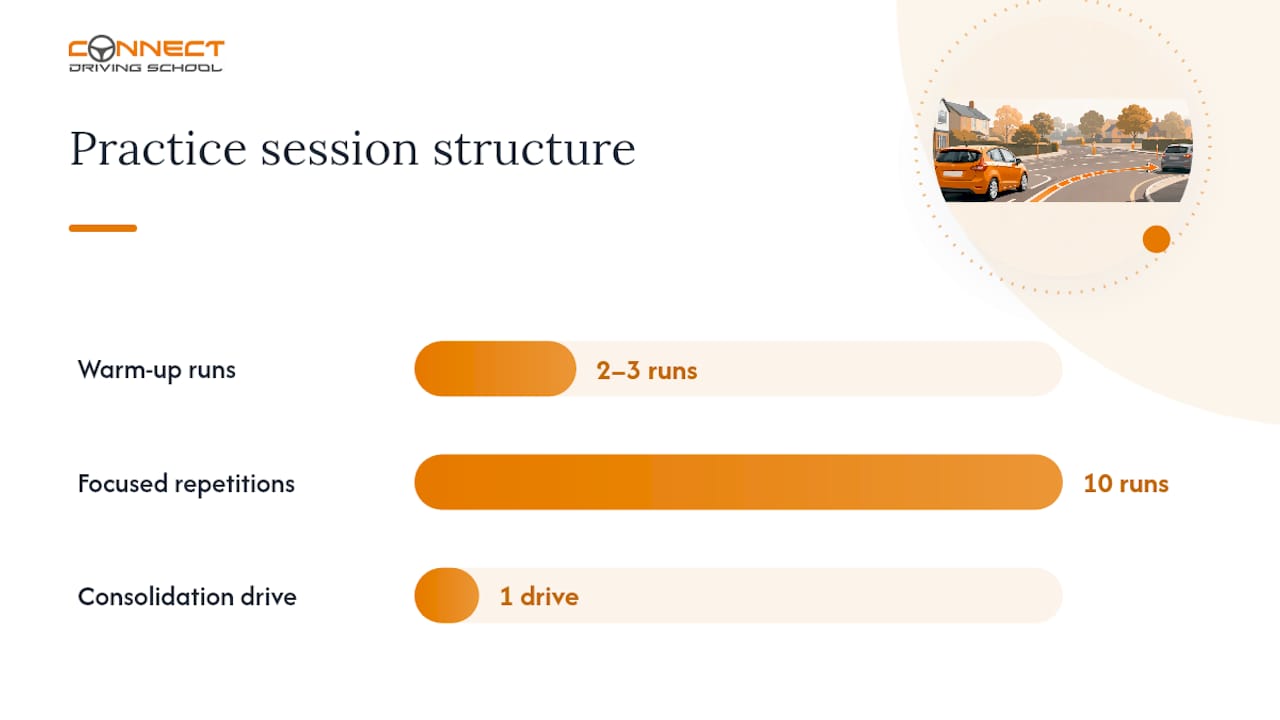
The fix isn’t more theory, it’s repetition. Instructor advice consistently recommends practising on a quiet residential through-road with light traffic, running through the manoeuvre ten times in a single session rather than once or twice across several weeks.
A sensible lesson structure looks like this:
- Warm up with two or three easy, unpressured run-throughs to settle nerves.
- Complete ten focused repetitions, using the same kerb reference points each time so you can genuinely compare performance rep to rep.
- Finish with a short, ordinary drive to consolidate the observation habits rather than ending on the manoeuvre itself.
Pro Tip: Ask your instructor to time each repetition and note whether you completed the full observation checks before assuming, out loud, “clear on the right.” A stopwatch and a spoken checklist expose the corners you’re cutting far faster than “how did that feel?” ever will.
Track improvement by watching for consistency rather than one perfect attempt. If reps three and eight look identical, you’ve built the habit. If rep ten is sloppier than rep one because you’ve stopped concentrating, that’s worth flagging before test day, not during it.
If you want a second angle on spotting hidden faults during practice drives generally, this test drive checklist is a useful companion resource for catching things instructors sometimes miss on a single pass.
Is it safe to pull over on the right in everyday driving?
The manoeuvre exists because stopping on the right does happen in real life, not because it’s the default choice. A short drop-off, a delivery, or a driveway that happens to be on the right are all genuine reasons a driver might need to do this outside of test conditions, as DVSA itself notes in its explanation of why the manoeuvre reflects real driving.
That said, the Highway Code generally favours stopping on your own side wherever there’s a reasonable alternative. Before choosing to pull over on the right side, weigh a few things:
- How much oncoming traffic you’d be crossing, and whether there’s a genuinely safe gap.
- Visibility in both directions, particularly near bends or parked vehicles.
- Whether cyclists are likely to be filtering past on that side.
If a slightly longer walk or a nearby layby avoids crossing the road altogether, that’s usually the safer call. This manoeuvre demonstrates that you can do it safely and under control. It’s not an endorsement to make it a habit.
An instructor’s checklist: what actually separates a pass from a fail
Doing hundreds of these manoeuvres with learners tells you where the real risk sits, and it’s rarely where students expect. The learners who fail almost never fail because their reverse wasn’t perfectly straight. They fail because they got tunnel vision on the steering and forgot the shoulder check, or they rushed the rejoin because they wanted the manoeuvre over with.
The checklist worth running in every lesson is short: mirror, signal, pause, reverse slowly, then a full observation before rejoining. Nothing on that list is complicated. What’s hard is doing it every single time, including on the tenth repetition of a dull residential road when concentration naturally dips.
Deliberate, slightly boring repetition beats occasional intense practice. Ten unglamorous reps on the same street, with the same reference points, build the kind of automatic habit that survives the adrenaline of test day. That’s the whole game with this manoeuvre. It rewards the learner who’s bored of practising it, not the one who’s merely capable of it once.
— Mudassar
Book focused manoeuvre practice before your test
Reading through the steps is useful, but this manoeuvre is built on muscle memory, and that only comes from repetition behind the wheel with someone watching your shoulder checks in real time. Connect Driving School is the practical route to that repetition.

Lessons are priced by the hour, allowing you to book short, targeted sessions to drill the pull up, reverse, and rejoin sequence until it’s automatic. If you’re within a few weeks of your test and this manoeuvre is the one making you nervous, book a lesson with Connect Driving School and get it sorted properly, with an instructor watching every shoulder check.
Sources
The rules and expectations behind this manoeuvre come straight from DVSA and GOV.UK, and they’re worth reading directly rather than relying on secondhand summaries.
Related Posts

Comments (0)